Flooding causes more property damage in the United States than any other type of natural disaster. Over the last decade, flood related damage average well over three billion dollars annually. After a flood, many homeowners will rebuild their house. Just as it was only to have the next flood do its damage all over again, there is an alternative to this cycle of flood rebuild flood again.
If the house is damaged more than 50 %, the community will probably require that the house be elevated above flood levels. But even if it’s not steps can be followed where the homeowner can repair their house in a way that can reduce or even eliminate the risk of future flood damage, we’ll be taking a closer look at these retrofitting techniques. But first we need to look at what possible flood site and building characteristics may exist. This is the first thing that any homeowner who is considering protecting their home should do. The reason is simple: a thorough understanding of the flood site and building characteristics is critical when selecting the right technique for retrofitting your home and believe me, selecting the right method up front will save you time and money in the long run. In fact, it’s a good idea to consult with a design professional to help you make this decision.
The important thing to remember is to consider how each characteristic 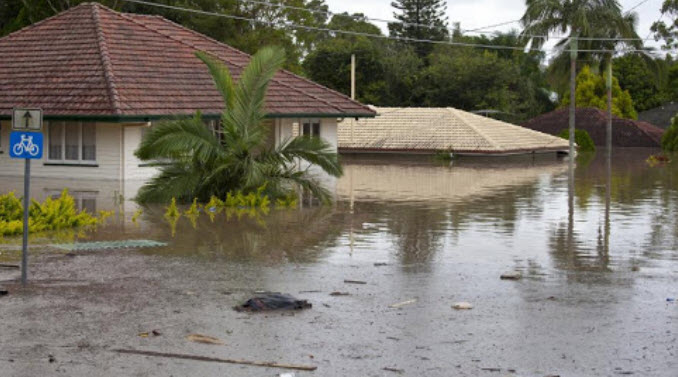 affects your home and then use this information to put together a realistic plan for permanently protecting your home against future flood damage to review. Consider the flood characteristics the depth, the base, flood elevation, the velocity, the debris potential, the flood duration and the warning time. Next review the site characteristics, its location within the floodplain, including the firm zone and the floodway, the general soil conditions and the potential for erosion. And finally know about the type and the condition of the house: you are dealing with the type of foundation, it’s sitting on, how it’s constructed with what materials and its overall condition. Well, I think that’s enough in the way of a refresher course. Why don’t we take a look at some houses that have been successfully retrofitted case studies? If you will, our tour will take us all across the country, and I’ve asked some local experts to help us out where available and hopefully the weather will hold out the first technique.
We are going to examine is relocation simply put. This is where a flood prone house is actually picked up and moved to a new location out of the floodplain. A relocation is probably the most effective way to avoid flood damage. After all, the final result is a house out of harm’s way, but this method is also one of the most expensive and will require considerable planning. In Middletown Pennsylvania, I had a chance to talk to a former project manager their relocation project. So each flood then finally prompted the relocation. Well, the decision was actually made as a result of Hurricane Agnes in 1972, and then hurricane Eloise hitting again in 1975, the river backed up and it caused the sweaty Rock Creek to overflow its banks and was causing the damage along with few Avenue area. The decision was made something had to be done about the properties in that area. A few avenues right up the road here is now right over here. How many homes were originally on? These Lots? Well, actually, for the houses were in this location and there was another one up on the corner. Creek is back the other side of the trees there and as a result of the flooding in 72 and 75, they had anywhere from 6 to 8 feet of water. In this location, well, give me a description of the move itself. First thing that had to be done was the foundations were knocked out underneath the houses, the house mover then moved in a series of dollies Jack the houses up and set them on the dollies. In order to prepare them to pull off, the old foundations house mover had walked this site, the location a couple of times before the move. So we knew which wires had to be moved out of the way which trees had to be trimmed back and was a real logistical problem in some locations which he handled very well. Once the house has reached the site up on North Union Street, they were put in place.
The foundations were built up from underneath them and, as you can see here, this is the final result of the four homes on North units. How economically feasible was it to relocate a house as opposed to say, buying or building a new one? Well, it was certainly a lot cheaper than building a new house and, as you can see, the houses aren’t all that old. The damage wasn’t that extensive. So the decision was if the homeowners wanted to go along with it. We just moved the houses out, hi Irene good. This is Kevin. Hi hi glad I see you it’s fine thanks. Chapman was just asking about the project and the background on it and why we moved the houses up here from few Avenue, and I thought maybe you could give him a little bit of information about the flooding and the damage and the reason why, okay in 72 And 75 the home was in a flood. In 72, the water literally came up over the kitchen cabinets. Everything was lost, the furniture, the keepsakes the valuables in 75. There was about four feet of water in the basement.
That’s bad enough, though I guess you’re happy with the relocation there yeah it’s worked out, you know pretty well, we have a nice piece of property with woods and you know being outside of town and also the peace of mind of being away from a body of Water, you know it’s men have to worry about it overflowing again. I’ve noticed you’ve done a lot of improvements to the property since the last time. I was up here yeah because of this the size of the property. We now have able to bring my mother from from town, and you know, build an addition on our house and now she’s living out with us, and it’s worked out equally well, that’s great! Can we take a look at some of the addition of a new project was unique in that for homes removed at once, whether it’s four or the key to success? Is the house mover and having always wanted to meet one? I finally had that opportunity and the person of dick napped down in Tampa Florida, just amazed that you can cut a house like this in half and move it and put it back together again.
What’s the hardest part of that process, probably the hardest part is on a job like this is tunneling under because of the clothes clearance of the ground. It takes a little more time. I see that’s the hardest part button. That’s easy! Yeah! Listen! I’D like to take you up on your offer of a tour that project you just finished up here any time, I’m ready! Oh, give me a few more minutes, I’m ready! You got it! Okay, thanks laughs! Thank you. This channel feeds right into Tampa Bay right straight. West of us is the baby. How badly can this area flood? We can get the high tide here as much as four or five feet over Cielo high sea level.
Here is this Doug’s house here we are right. There this is masonry construction, any special challenges and moving this house a couple. Three you got cutting the building and two is one and, of course, moving it down. Moving a two-story down. The road is another challenge. We don’t have all the cables and power lines to get under and over and of course, the one of the challenges always an all billing moving is getting it lined up on the profit in and building from the ground up to the building put the new foundation Under it, after the building’s in place, this is a good size house that you’ve moved here yeah. We move this one and two pieces of a 2-story section and a single-story. Now this new deck work here. This is at the same height as the new floor level. Yeah, this is the height that we had to maintain. We had to raise the building four feet here to meet the flood zone in this area. Now, where was the cut made right up there at the gutter? You can still see where the gutter is still cutting to there, where it was sawed in half right there mm-hmm and I went down right alongside the window.
There’s nothing showing there has all been repaired. Yeah you hadn’t told me this house had been cut in half. I don’t think there’s any way. I could have guessed it’s pretty hard. How do you generally estimate the cost? We worked on a square footage figure in masonry. Homes costs $ 12, a square foot plus or minus. What’s just got a run dug when all said and done, oh he’s got the 20,000 in the moving and additional mm in the elevated foundation. From this angle, you can really see the elevation compared to the neighbor’s house, looks like Doug’s going to be in better shape.
Next time it floods – oh definitely they all have a problem when the water comes up one of these days, listen you’ve done a great job on this house that you really make it look easy relocating out of the floodplain. Is the surest way of eliminating damage from floodwaters, but sometimes this option isn’t possible or necessary if you can’t get out of the floodplain. The next best alternative is to raise your house above flood levels. Elevation is probably the most common and feasible method of protecting a home in the floodplain like relocation. Elevation requires considerable time and planning the house must be prepared for elevating, and an appropriate foundation must be chosen to make the right decisions all of the flood site and building characteristics we talked about earlier need to be closely examined, for instance, take where I’m standing right
Now it looks tranquil, but this entire Peachtree Creek area is in the floodplain and as residents found out on St Patrick’s Day 1990 heavy rains can quickly raise waters to record flood levels evening. I knew we were in trouble because the mailbox was under water. The water had risen halfway up the house and at 4 o’clock in the morning it got past the fifth step and I gave up went to bed well. How long did the water stick around before it started to recede till 7 o’clock the next evening? It took that long and at that point people could get out move about. So I guess you were counting your blessings that you’d elevated back in 76.
The Rutgers house was elevated one full story on solid, concrete block foundation walls, a number of other homes on the street, we’re also lucky enough to escape serious damage because they had been elevated. One of those houses is just down the street after being flooded several times in the 1970s. The owners there finally decided to elevate lifting beams were used to raise the house. One full story. Above its original foundation, utilities were elevated, a new foundation and stairway were built and the house was lowered onto its new foundation. Probably one of the most distinctive aspects of the house are the stairs, as you can see, they’re split to come down on both sides, and this is a simple way of breaking up the look of the house. Once it’s been elevated, the Curtis house has been built up on concrete columns. All of the columns like this one have been covered with stucco, which looks a lot nicer than the bare concrete. In addition, the area between the columns has been filled in with a wood latticework, and this allows water to flow in and out without causing any additional damage.
I was curious as to how well your house held up no problems. The water was deeper than it’s ever been about five feet where we are, but the house was dry and no problems at all. It’s great, Mrs. Wrecker said pretty much. The same thing yeah, I was curious. The last time I was here. What exactly is this? This is the central heating and air conditioning. It was raised about six feet above ground level. At the time the rest of the house was raised so elevated and enclosed all. At the same time, I imagine during the recent flooding you had no problems with your utilities and none at all they continued as usual. That’s great Ernie! I know that back in 76, your house was elevated, the Rutgers elevated their house that same year, your neighbors have obviously elevated. I’M told there’s an elevation project actually in progress right around the corner. Here is that right, yes, Michael Hawaii bought a house recently decided to have his raise before he moved in that’s going on now.
That’s a smart move, listen I’ll! Let you get back to your gardening thanks. So much for your time. Paul Gertler, a contractor who’s worked on. Most of the homes on this street is probably working on Michael White’s house. Right now you know I haven’t had a chance to have to examine a house at this stage. Do you mind showing me around no come on? I appreciate that I see you’ve gotten a lot work done over here already. So what was the first step? The installation of the beams? I imagine that’s right. We had to put the beams out of the house, which ones went in first. The main beams are running beams, which these long beams here and then the cross beams were added. They go on top of those beams. I see now what happened here with the old foundation. Why is that broken away? Well, we have to destroy part of the foundation wall to get the beams out of the house. Oh, I see another lifting took place, that’s right, and how is that done? If you notice, we have cribbing here and that supports the house and steel, and this raise the house. Okay use any kind of hydraulic jack system, we put hydro Jackson cribbing and raise the house up now. The lift itself is that done all at one time or the done in smaller increments. Well, it’s done in 12. Inch lifts, oh I see, and how long does that take well, this particular house took a day than left appalled from start to finish. How long does this process take? We work in two or three months, but what about cost? Is there an average? Well, there’s an average house there’s an average cost okay! Well, what about this house specifically, then ten thousand raise this house. Does that include the cost of the new foundation, no foundation costs in addition to that another? How much ten thousand so, in other words, homeowners, need to realize there are a lot of variables involved when estimating the cost of elevating there’s a lot of various expenses.
Cost is clearly a factor when elevating your home. Now before we take a look at some other ways of protecting your home from flood damage. Let’s take a quick trip to Libertyville Illinois, where last week I had a chance to speak to the stock family about their recently elevated home house was built in about 1955, and when did you and your husband move me, we moved in an 84, you elevated, not Long after that, did you a couple months after we moved in, we called the contractor and he came in and raised the house and he put three rows of concrete block along the edge of the foundation. Your husband mentioned that you did some of the work yourself. We did, we wanted to save money, so we did the plumbing work ourselves that must have saved you. A small fortune did when you elevated, did your elevate to the same height as the next-door neighbor.
We used his home as an example. As a matter of fact, we raised it three levels of blot, just as you see there in 86, this whole area flooded. How badly did that affect your house? Well, the water came up about three feet about two here, which is just above the concrete block. So did any water get inside at all? No, not at all. It missed the floor by about eight or nine inches, so you were very lucky. We saved a lot of money. If you don’t mind my asking this question, what was the final cost of the entire elevation project? Final cost was about five thousand dollars, that’s not bad. No, it isn’t really yeah. You got a little bit more renovation work to do. I say I’m some siding and we’re also doing some windows. This is the little Calumet River just outside of Chicago. Only last month, heavy rains brought water levels here to just below the top of this old bridge abutment.
Now, when it does flood in this area, flood waters tend to be shallow and slow-moving, but don’t forget even a foot of water can cause extensive damage to an unprotected home in these areas where flood conditions are not as severe an alternative to relocation or elevation may Be to protect the building by using berms and flood walls. With these techniques, the house remains structurally unchanged. What changes is the surrounding topography, a structure of some kind, a wall or an embankment now protects the home from flood waters. To help us understand more about these techniques and when it’s best to use them, I’ve asked Molly O’Toole an engineer with the Illinois Division of Water Resources to lend us a hand. This is a walking on right now yeah. This is a typical berm that was built by the local community to protect the homes that are located over here from the low-level flooding that they received from the Calumet River, which is located over on this side Molly.
What does it make the most sense to use this kind of flood protection? Probably the most important thing is that you’re only expecting to receive that low level low velocity flooding that will only last for about two or three days. If that’s the case, then burns proved to be relatively inexpensive, yet very effective ways of protecting properties from flooding. I do. The soil conditions have that much to do with the berms feasibility mm-hmm. Definitely most all berms are constructed of a compacted clay. Soil and clay is a very imperfect that comes through the berm. What if a community has the wrong kind of soil? Well then, it can be very expensive to truck in or haul in the right kind of soil Molly from up here, it’s a little difficult to tell exactly what a berm is made up. Can you walk us through the steps of creating a berm sure the first step in constructing a berm is clearing away the area of any time, soil or vegetation? Then the berm itself is constructed by building up individually compacted layers of soil, and these are called lifts and a core of impervious soil can help prevent seepage and properly sloping.
The berm will help reduce the potential for erosion. Typical side slopes are 1 2 3 and that’s part of why berms tend to take up so much space again. If the proposed construction is located within a flood way, a permit won’t be issued. That’s because activities within flood ways will increase flood heights. Another thing to remember that maintenance of a firm like this is a year-round activity and it’s very important to schedule regular inspections for both seepage and erosion, and you want to be sure that you don’t have any unwanted trees or other vegetation growing on the boom. Now we wanted to take a look at some examples of flood walls. Are there any in this area? I know some good examples up in Lincolnshire. If you’re interested in the drive up there lead the way. Ok, how far a trip is it Lincolnshire, they’ve landscaped, nicely right up to the wall?
This is an attractive example of one I thought you’d like it. They did a good job, it’s about three feet high and they built it of reinforced concrete, but then they covered it with this decorative stone and then they surrounded the entire house, the the front, the back the sides with the flood wall and that protects them against The low lava flooding that they received from the Des Plaines River is reinforced concrete, the recommended construction material or you could use reinforced masonry block as long as material has a lot of strength and in permeability or resistance to leakage. I have built themselves a strong wall. I don’t think the owner will mind if we look at the wall out back to you, I was just showing Kevin your flood wall on the back here. We notice that it’s just the reinforced concrete without the decorative stone that you have in front yeah that surrounds the entire house and I just decorated back here a little differently or landscaped. I used everybody’s as opposed to the stone in the front. I compliment you on your work. Thank you during last month’s flooding. Did that adversely affect your property at all, not really Kevin? It came up to the horseshoe court and we didn’t have the amount of water as we did in 86, and how far back into the woods is the river 150 yards come on back and I’ll? Show you, okay after you, Molly floodwalls are versatile enough to be used in many different ways and, as I learned recently in Minnesota, they can be tailored to the needs of just about any kind of home.
This is Bassett Creek outside of St Paul Minnesota and behind me is an example of a flood wall that was completed in 1982 now flood walls do require skilled labor and are often more expensive than berms, but the basic approach to building them remains the same. First, the soil is excavated and a footing put in place. Then a foundation is laid along with proper reinforcement to tie into the wall. Then the wall itself is properly reinforced to withstand flood forces. All of this requires the assistance of a professional engineer. Dean Salman was in on the original design of this flood wall beam thanks for joining us, Oh Karen, and what’s distinctive about this flood wall. We tied this flood wall into the corners of the house around the existing patio to prevent the waters from entering the walkout basement. When the Bassett Creek overflows its banks, those waters tend to be somewhat shallow and slow-moving.
This particular height for the flood wall 100-year flood elevation that we use for the design is at approximately this elevation as an additional factor of safety. We added a foot to the wall. I noticed a drain system of some kind of down on the patio. Why don’t we go down the steps over there and see just so? The sump pump is here for the interior drainage. Well, the sump serves two purposes. The rain that falls directly on the patio is collected and drains it drains to the something is pumped out.
We’ve also got drain tile lines that run around the corners of the house. This lowers the ground water table and relieves the pressure on foundation. Walls that should keep the patio dry during storm conditions at the top of this slab. Here is the same level as the house floor inside, which means we’re dealing with a sunken patio. What’s the advantage to that? Well, typically, during a severe rainfall event, you have power, outages, we’ve lowered the patio so that we can store the ten year rainfall event with no water entering the basement. Now, how about explaining for us how the concrete block is tied into the footing? We’Ve got reinforcing bars that run down through the voids in the concrete block, it’s tied to and reinforced concrete footing and all the voids are filled with throughout. Well, they’ve got a nice usable patio area here, they’ve enhanced it with landscaping. It added this flower box. Here this looks like a flood protection plan.
That’s probably increased the value of the house. You we’re now going to take a look at a number of diverse techniques that we’ve grouped under the heading other measures. These techniques will rarely offer the same level of protection. You’ll find with relocation, elevation, berms and floodwalls, and they’re only appropriate for homes that are subject to low flood levels or storm water damage and, of course they must adhere to your community’s floodplain regulations. But overall, these are low, cost simple measures that can be easily added to an existing home. Most of these techniques still require a professional contractor, but some of them, as you’ll see, can be done by the homeowner sealing. A house is where the exterior walls are improved. To keep out the floodwaters .
A slab foundation house is often subject to seepage during flooding and you’ve added some sealant down here. How about taking us through the steps of what you did yeah I fielded 14 inches above ground and probably just below ground, and then I first step was I cemented it all way and then I tarred it. Then I put a plastic paper over that. Then I tied it again now: back in 86, you had flood levels coming up about 12 inches or so it a whole turn aired, and what about the cost of this job? Well, roughly speaking about $40 and then, of course, the labor is free.
On Ann Marie Lane, homeowners have used several sealing techniques due to heavy storm water runoff. For instance, here they’ve used a combination of driveway elevation and a mini flood wall to protect their lower level garage space and here’s another example of lower level garage protection when flooding threatens you simply step outside, remove this plank from its hooked, and where do you place This huh, you put it in the two slots here, making sure it’s sealed on both ends and on the bottom, and how often do the flood in this area approximately three to four times a year and now that it’s in place? How well does it work? It works like a charm if there’s one kind of flooding that many of us have experienced firsthand its basement, flooding basements are particularly vulnerable to seepage and sewer backup and a secret to protecting basements is simply knowing whether or not your home is in the floodplain. If it’s not, you can probably go ahead and use some of the techniques we’re about to show you, however, if your home is in the floodplain, where it could be surrounded by water, water pressure stands a good chance of collapsing.
Your basement walls in these cases, when flooding threatens your best protection, is to turn off your utilities, block off your floor drain and either allow floodwaters in through a window or fill your basement with cold tap water. Doing this will counteract the outside pressure and hopefully keep the walls, in fact our first example of protecting basements from storm water and sewer backup. Is this raised ranch in Cook County Illinois? What steps have you taken to protect your basement entryway? I was showing a daughter. This brick wall area originally was an open area by breaking it in eliminate sandbagging. At this point. Backup is often a problem.
We’re looking at overhead source system and what’s the advantage to this, to eliminate the water from the outside entering the inside structure? Is that because this pipe is above ground level, it’s true now? How about explaining exactly how this thing will see? The water is collected in the sump pump well below us, a certain height will activate the sump pump. The water rises through these pipes is eliminated in meets a sewage pipe on the outside. That’s it well. Mr. Rosato used an overhead sewer system. Another form of protection is the use of a backflow valve. As I learned when I talked to Pat Regan, you mind giving us a brief description of how this system works. Oh sure, this system is installed in the sewer line so that when heavy pressure from the city sewer comes back towards a home, it’ll close the flood control valve and stop the pressure from coming the whole. Then any water coming from the house will come out.
The overflow opening down to the pump and the puffs will turn out and force the water back out to the city sewer system in front of the closed valve. I got a few more questions for you, mine, coming out of the home. Oh sure, you need a hand. No, what are some of the advantages to using this kind of system? Well, one of the major advantages in this type of system is that it stops the pressure and keeps the pressure away from the house during the heavy rainstorm. Now, what about cost? What’s the estimated cost for installing one of these in a residential home? Oh average, Chicago residential home, is approximately four thousand dollars, but this will vary depending on the depth of your sewer line.
The amount of electrical work needed on the inside of the home to make the proper connections and your own local building codes. The final grouping of other measures we’ll take a quick look at is what we call partial protection measures, also known as wet flood proofing. This is where water is allowed to enter the house, often because it simply cannot be prevented and steps are taken to reduce the damage, and here the homeowner has used a tiled floor instead of carpeting to make cleanup easier.
They’ve also used the waterproof paint on their concrete walls instead of wall board, and one final thing they’ve done is to elevate their electrical outlets above flood level. We’ve seen the cost of protecting your house can range anywhere from $ 40 to thousands of dollars depending on the chosen technique. What, then, is the best way of choosing that right method for protecting your house? Well, a good place to start is with a basic spreadsheet tool that has listed on the one side, the flood site and building characteristics and, on the other, the different flood protection techniques. Obviously, you have to know some basics, such as the flood depth velocity, whether your site is in the flood way and the overall condition of your building. Once you have this information walk through your available options by comparing these characteristics with the feasibility of each technique. For a more detailed example of this, as well as additional information on all the techniques we’ve talked about today, you can refer to the Federal Emergency Management agency’s retrofitting manual and finally, if you’re considering hiring a contractor, make sure you review credentials find out if the individual Or a firm has done similar flood protection work and ask for a recent listing of projects similar to the one you’re contemplating.
We’ve covered a lot of material as well as a lot of ground on this program from all over the country. We’ve seen flood protection techniques, ranging from moving an entire house, is simply preventing water from collecting at the bottom of a driveway. While a world of cost and planning separates the simplest from the most sophisticated technique, there is one common denominator that follows through all of these examples that we’ve seen today and that’s the knowledge that homeowners can, by these techniques successfully to protect their homes from flood damage. You can break the cycle of flood rebuild flood again as long as you know your flood site and building characteristics through the proper planning and always remember that flood protection techniques are meant to protect your house, not your life, I’m Kevin, Murray and I’ll see you next Time on another edition of best build